Eggcellent Easter Crafts
Author: Tessa Date Posted:21 March 2022
.png)
Update 2024: Some of the products in this blog are no longer available. We hope you still find inspiration to get arty this Easter.
We got some really cute easter craft stock in this year and we wanted to show you some fun ways to use them for decorating!
Ok, so we got a little bit eggcited (sorry couldn't help ourselves there) when we saw these cute little Polystyrene eggs and wanted to paint them all different kinds of colours!! We thought the perfect paint for the job would be the delicious big set of Mont Marte Crafters Acrylic Paint. With so many colours to choose from and only 6 little eggs, it was tough narrowing down the colour palette for this project! In the end we chose, Lavender, Heather, Apple Green, Leaf Green, Pastel Yellow, Sunflower Yellow and Gamboge. Let's get stuck into what you'll need to follow along with this project!
.png)
.png)
.png)
Woah there partner, that's a lot of products!
- Polystyrene Eggs 5x3.5cm 8pc the eggs - they are pretty essential for any Easter craft
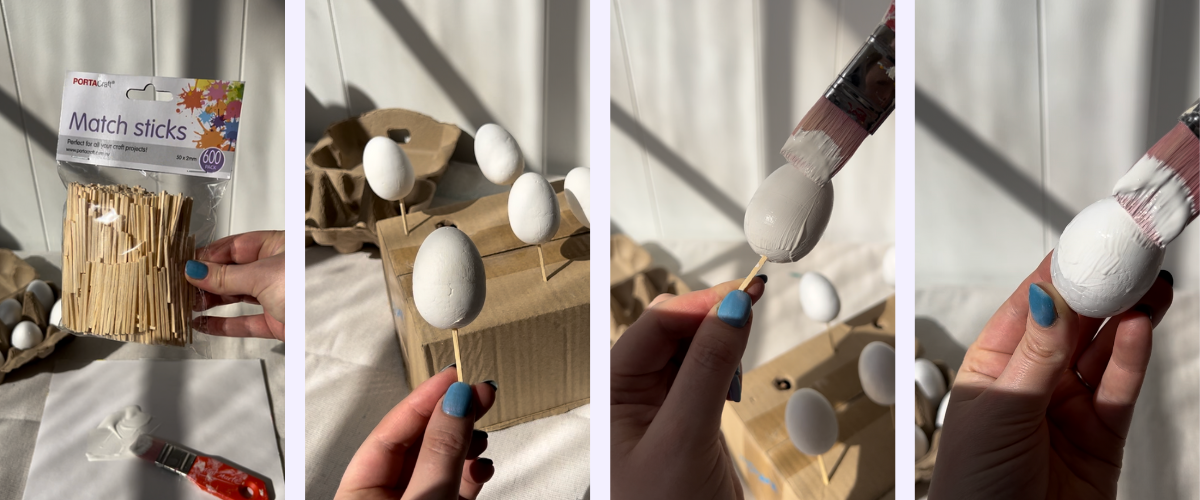
- Portacraft Match Sticks 600pc Natural - if you have toothpicks or skewers at home even better!
- Mont Marte Gesso Primer - White Texture Gesso 250ml - just to make sure that paint sticks to the eggos
- Mont Marte Taklon Abstract Expression Brush - 25mm - to apply the Gesso (we just had this one handy)
- Mont Marte Gallery Series Paint Brush Set - Acrylic 6pc - some more brushes to apply the cute details you want
- Mont Marte Discovery Crafters Acrylic Paint Set 48pc x 60ml
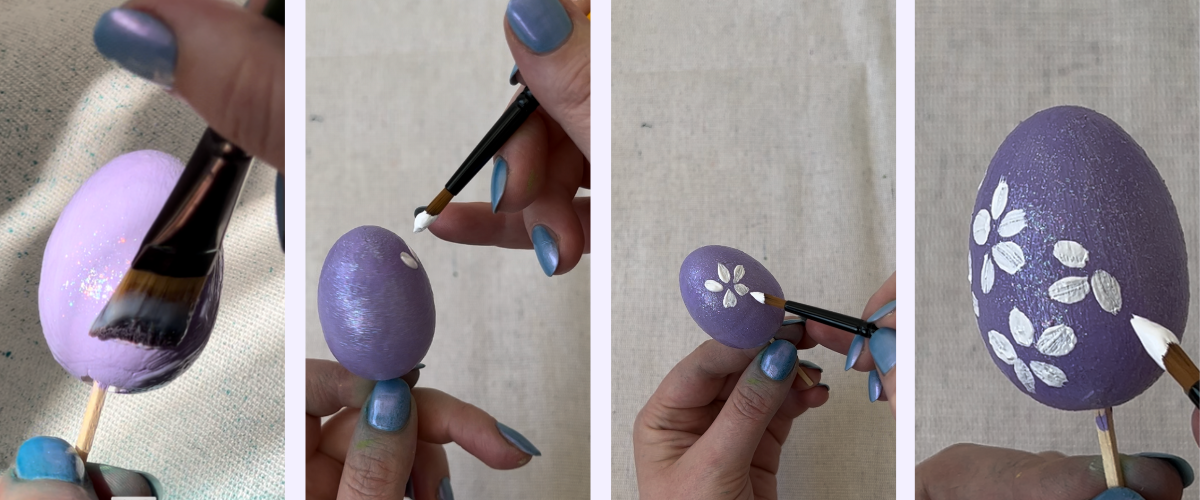
- Mont Marte Acrylic Medium - Iridescent Varnish 240ml - we used this on one egg to add that extra bit of sparkle
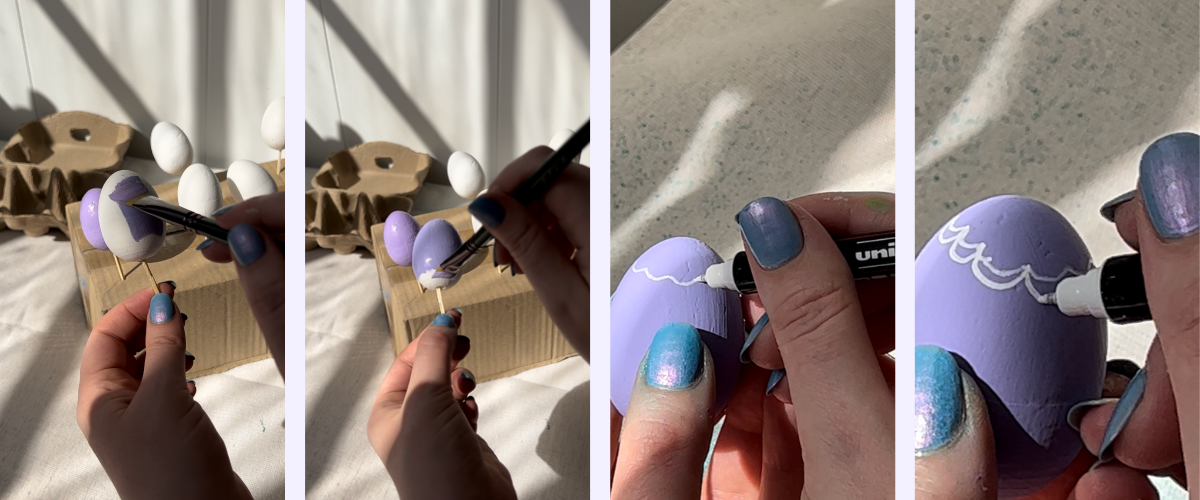
- Uni Ball Posca Pen Medium Bullet Tip 2.5mm PC-5M - White - to draw eggs on the eggs!
- Uni Ball Posca Pen Ultra Fine Pin Tip 0.7mm PC-1MR - White - for those extra fine lines
- Egg Box 6 Tray Natural 3pc - to display your eggs in forever!
- Easter Basket Filler Natural 30g Assorted

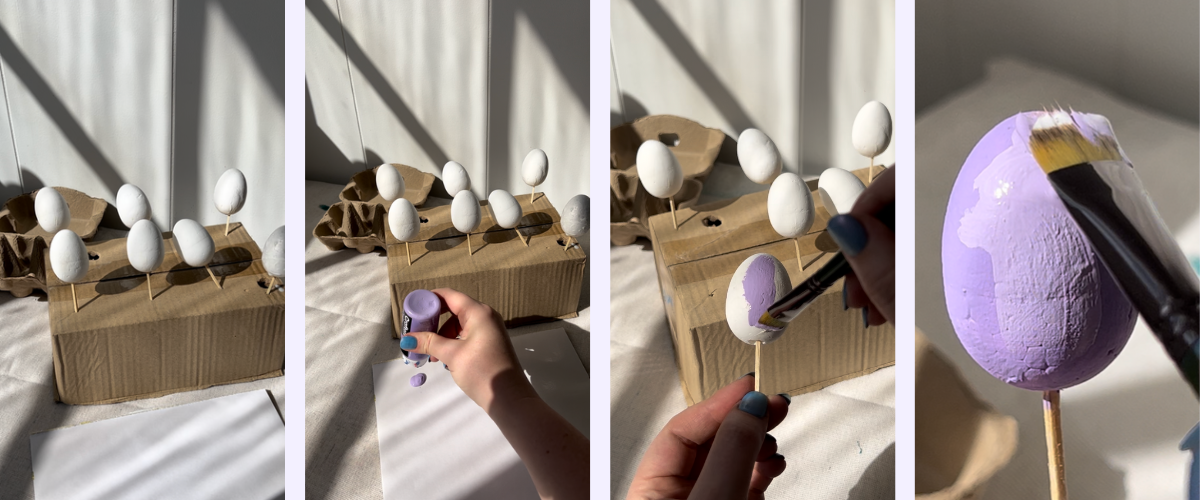
Let's be real, we started painting the Gesso on the eggs, then panicked and thought, this isn't going to work, we need something to stand them up on!! Enter the match sticks! Push them into the base of the egg, then you'll have something to hold on to with out getting paint and gesso all over your fingers. We used an old cardboard box to then push the match sticks into to stand them up. Once you have covered all your eggs in Gesso, it's time to start painting them in all the fun colours you llike.

Make sure you apply a few coats of paint, to get a good even coverage across the surface of the eggs. The Crafters paint has a super matte finish, which is perfect for craft projects like this one. This egg is painted with the Lavender colour from the set.

We covered this egg in two coats of Mont Marte Acrylic Medium - Iridescent Varnish 240ml and it looked so cute and sparkly!! We then painted some simple white petals randomly around the egg using the Round No 6 from the Mont Marte Gallery Series Paint Brush Set - Acrylic 6pc

We painted the next egg with the colour Heather and decided to draw some organic scallop shaped patterns around the egg! It was a bit tricky so make sure you have a steady hand!! We used the Uni Ball Posca Pen Ultra Fine Pin Tip 0.7mm PC-1MR - White
.png)
Next we painted some yellow eggs! Starting with Sunflower Yellow for the base, we then used the Uni Ball Posca Pen Medium Bullet Tip 2.5mm PC-5M - White to draw the little fried egg shapes and then using Gamboge to paint in the little egg yolks!
.png)
We then painted a Pastel Yellow egg and repeated the same design in a slightly smaller pattern and with the Sunflower Yellow colour as the yolk.
.png)
And finally for the green eggs (what... no ham?!) We applied the base colour of Leaf green and then using a darker contrasting Olive Green, we painted on some more simple petal flowers. We used a bit of water with the Olive Green colour to allow some transparency.
.png)
For the last egg, we used Apple Green and went back in with the Uni Ball Posca Pen Ultra Fine Pin Tip 0.7mm PC-1MR - White to draw some small organic flowers as a repeat pattern around the egg.
.png)
Once your eggs have finished drying it's time to display them in the little carton with some beautiful natural basket filler!
We're sooooo chuffed with how these turned out!! We think they are so cute! These would be so great with a few real choccie eggs thrown in, as a gift for someone. You could even make them into a little bunting with some twine and a big sewing needle or maybe even make them into little hanging decorations? They make the sweetest little Easter display no matter what!!
If you give these eggcellent craft ideas a go please tag us on Instagram @artshedonline we'd love to see what you get up to! As always, stay creative!

.png)


